Wave Curtains – How To Measure & Fit
Wave Curtains are unlike any other curtain option in that they are manufactured to precision so that the pleats fit exactly to the track. At Terrys we provide a track with all of our Wave curtains to ensure your curtains fit perfectly to the size that you provide us.
Wave Curtains can be made to fit inside or outside of a recess window or door. In both cases you will need to provide the overall width and drop, and then the curtain will be sized to clear the floor and the curtains will sit below the track.
Before We Start
Please note: Our Wave Curtains come with a FREE track. We only recommend that the wave curtain and track to be used on straight windows as this track requires professional machinery to bend to fit your window. Please also note the track will always sit above the curtains. If you are wall fixing we supply the brackets for the perfect fit.
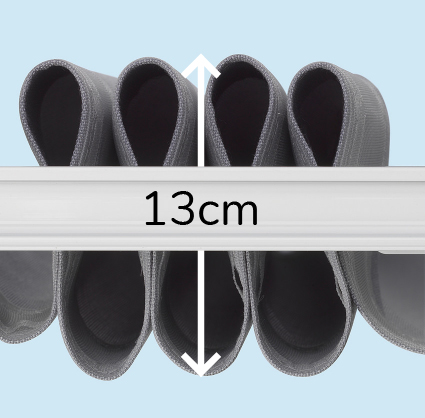
The depth of our wave curtain pleat is 13cm front to back. You should allow for door/window handle depth or other obstructions; as the curtain folds both to the front and to the back equally from the point of the track (see image below). We recommend allowing 15cm depth if you wish for your wave curtains to hang flush with the front recess.
Recess, Ceiling fix and Wall fix - Our Wave curtains are made 1cm shorter than the measurement you provide and 0.5cm either side of the curtain(s) to allow for tolerance. The track will be cut 1cm shorter too.

Measuring For Recess/Ceiling Fix
Recess/Ceiling – Measuring Width
We need you to decide the position of the track first, to measure its width. Please remember to take window/door handles into consideration when taking your measurements.
If you wish for the front of the curtain to be hidden within the recess, please measure 6.5 cm from the edge of the recess and mark with a pen.
If you are setting curtains back or forward in the recess allow 5.5cms for the front of the bracket to the front of the curtains. Once you have chosen where to mount your track draw a line or mark approximately every meter; this will be where the brackets will go. The line you draw will mark the front of the bracket.
Measure the width of your track on those lines. It is advisable to measure the width in three more points to ensure that the Recess Wall is relatively straight. We recommend you measure the recess width from top, middle and bottom. If the window is not straight use the smallest measurement as the width.
For Ceiling Fix: Measure the width that you would like the track to be. Note as above, allowance is required for the pleats of the curtains front and back, we recommend a minimum of 8cm.
Recess/Ceiling – Measuring Drop
Depending on the width of the window/door; measure the drop from the top of the recess/ceiling to the floor/seal at a minimum of three points. We suggest that you measure at three points one metre apart.
The smallest of these measurements, is the drop that should be used. The track and bottom clearance will be deducted from this measurement when manufacturing the curtains.
If you are top fixing to the ceiling, draw that line no closer than 8 cm to the wall, to give your wave curtains enough room.
Measuring For Wall Fix
We need to first establish your track position. A good rule would be to half the distance between ceiling and window/door ensuring maximum possible overlap from the top.
Measure the distance from the ceiling to the window/door in at least three places (left, middle & right), half it and draw a faint line. You can use a spirit level to do that as well. Those lines represent the top of your track.
Wall Fix - Measuring Width
Measure the width that you require. Simply measure from where you require the track to start on the left to where you require the track to finish on the right including the overlap on both sides of the window/door, we recommend adding a min of 15 cm to each side if possible.
Wall Fix - Measuring Drop
Use the lines marked for your top of track position and measure the drop in at least three places (left, middle, right). Make a note of these and use the shortest measurement of these as the drop for your curtains.
The top of the track measurement is where the track will be positioned, and the curtains will hang below the track. There will be a deduction of 1cm in the length to allow for tolerance.
Things To Consider
The Wave curtain is available as both a single curtain and pair. A single curtain is a good option if a door opens at one side. In this case the single curtain can be placed on the opposite side.
There are also other benefits of using wave;
- In a recess, wave curtains can be fitted across a large expanse with a discreet track.
- The Wave heading "stacks back" to a small area. The pleats fold back and front, which provides a tight pleat taking up less space than any other heading.
- Due to the way that the curtains pleat both open and closed these curtains provide a more formal pleat that is structured in such a way that each pleat is of the same size.
Fitting Your Wave Curtains
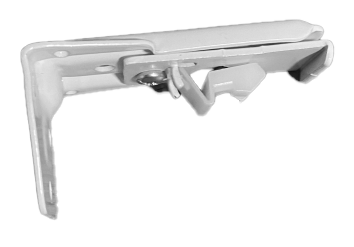
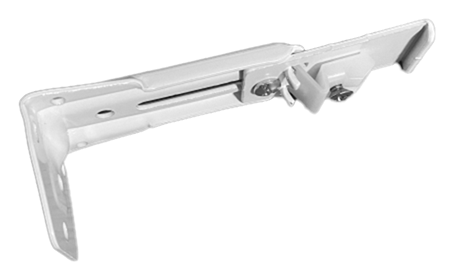
You will receive yours curtains and a track. The track is provided with universal brackets. These can be adjusted for the two fitting methods detailed below.

Recess/Ceiling Fitting
The bracket has two parts; remove the bolt and then the remaining bottom flat fixing is all that you will require. Remove the plastic fixing with a pencil and set aside as this will be needed in the final fixing.

- Place the flat fixing behind the line with the curved part pointing down and towards the recess.
- Mark the back hole and the hole that holds the plastic part that was removed with a pencil.
- Remove the flat fixing and drill a hole.
- Fix a heavy duty raw plug in both holes for each fixing.
- Align the hole of the fixing to the hole of the raw plugs then fix the back hole of the fixing with a screw.
- Once the fixing has been secured, click the track in place. To finish the fixing, remove the current screw in the plastic fixing and replace with a longer screw drilling through to the raw plug.
Wall Fitting
- Place the side of bracket below the line and mark the holes with a pencil.
- Remove the bracket and drill a hole where you have marked and fit a heavy duty raw plug.
- Align the hole of the bracket to the hole of the raw plug and then fix the bracket with a screw.
- Once all brackets have been fitted, click the track in place and tighten the screw behind it to secure it in place.

Additional Information
- Track measures 20mm width x 14mm depth. Please note that this is an approximate measurement as batches can change.
- The dimensions between the carriers is 8cm.


